The day has finally arrived! It is my day to have the spotlight for the
12 Days of Christmas in July Blog Hop.
All of the details for the blog hop as well as the fantastic giveaway can be found at Sarah's blog:
confessionsofafabricaddict.blogspot.com Just sayin', if you make a comment on my post today, you are entered into this fantastic giveaway. There are two more bloggers participating today and here are their addresses, so you can enter there too.
anjaquilts.blogspot.ca
adreamandastitch.blogspot.com
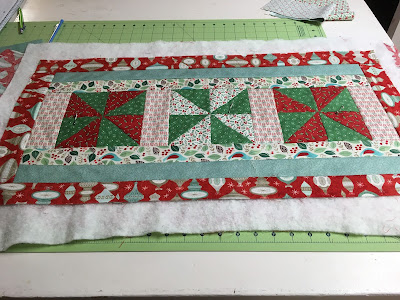
The project I am featuring is a quilt as you go table runner. It can be made any size or shape and works just as well in a square as it does a rectangle. It is a great way to use up batting and fabric scraps and strips. Also, if you have orphan blocks left from other projects, here is a great way to put them to use for holiday gifts. Here is the one I chose to make for our little tutorial.
My Christmas scrap bin looked like this:
besides having some fat quarters and small yardages. And I had some frankenbatts that were about 18" x 30". So this is what I chose to do. If you choose to sew along with me, here is what you will need:
Scraps or fat quarters of chosen fabric. If you are using fat quarters, you will need 7. I actually used 5 and some smaller scraps.
Batting, a piece approximately 18" X 30"
Backing fabric, approximately 20" X 32"
Sewing machine with walking foot or even feed foot.
Normal sewing supplies
This is a fat quarter grouping I purchased in the sale room at my LQS.
I love that little Christmas tree print on the left, but there was only about 6" of it. I decided it could become pinwheel blocks for the center. I made 6-1/2" unfinished blocks, starting with 3-1/2" strips, cutting the HST's with my Easy Angle ruler, my favorite method.
If you make your HST's from squares, you will need 4" squares, then trim your HST's to 3-1/2". Press well. (Don't you just love the little triangles it makes on the back when you spin your seams?)
I made three pinwheels and put them together with 2-1/2" strips of another fabric. You can do this center anyway you please according to the piece of batting you have and any blocks you have on hand or decide to make.
Choose your backing and cut 1" larger than your batting on all 4 sides. Mark the centers on your backing, batting and center design and layer with centers matched. Spray or pin baste layers together. (I do both).
Secure the three layers together by adding your first strips to the ends of your center design. Place another 2-1/2" strip on each end, RST, sewing through all layers, using a 1/4"seam and your walking foot. Trim your strip even with your center blocks.
Press seam toward the outer edge. Repeat on the other end of your center blocks.
Now using 2" strips of a coordinating fabric, add strips in the same manner to the long edges.
I was using fat quarters so needed to seam some of my strips to make them long enough. I used the diagonal seaming technique to make the seams less obvious.
Be sure to press each strip toward the outer edge before adding another strip.
I added another row of 2" strips on the long edges before adding the border on all four sides.
I made the border from 2" strips also, sewing on the short end strips first. Press this last row toward the outer edge.
Now is the time to add some quilting to your center blocks if you would like
.
I used a curved line through the center on the green HST's.
You can add as much or as little quilting as you wish. Remember, you were quilting the layers as you were adding your strips!
I used 2" binding strips in a different coordinating print, pressing them WST to make a 1" binding, sewing to the right side by machine, turning over the edge and hand stitching to the back. This makes a very snug binding. If you prefer, use 2-1/2" strips for a wider binding.
Now for an optional design.
The center fabric was something I fell in love with last year. It is a Holly Taylor fabric, called Town Square. (Good luck finding it if you love it too.) I used it for a center panel, fussy cutting the design to fit my size. Using the same quilt as you go technique, I added 2" strips in coordinating fabrics, only this time I added them in a courthouse steps style to all four sides.
I used a large meander to quilt the center.
The possibilities are endless with this technique. If you try it and like it, send a photo to me and I will include it in a future blog post. Or if you use Bloglovin, just add it to a comment on this post.
I hope you enjoyed this project and will visit again soon. Remember to leave a comment to be included in the drawing for those great Tula Pink fabrics.
And keep on stitchin'
Judy


