
The day has finally arrived! It is my day to have the spotlight for the 12 Days of Christmas in July Blog Hop.
All of the details for the blog hop as well as the fantastic giveaway can be found at Sarah's blog: confessionsofafabricaddict.blogspot.com Just sayin', if you make a comment on my post today, you are entered into this fantastic giveaway. There are two more bloggers participating today and here are their addresses, so you can enter there too.
anjaquilts.blogspot.ca
adreamandastitch.blogspot.com
The project I am featuring is a quilt as you go table runner. It can be made any size or shape and works just as well in a square as it does a rectangle. It is a great way to use up batting and fabric scraps and strips. Also, if you have orphan blocks left from other projects, here is a great way to put them to use for holiday gifts. Here is the one I chose to make for our little tutorial.

My Christmas scrap bin looked like this:

besides having some fat quarters and small yardages. And I had some frankenbatts that were about 18" x 30". So this is what I chose to do. If you choose to sew along with me, here is what you will need:
Scraps or fat quarters of chosen fabric. If you are using fat quarters, you will need 7. I actually used 5 and some smaller scraps.
Batting, a piece approximately 18" X 30"
Backing fabric, approximately 20" X 32"
Sewing machine with walking foot or even feed foot.
Normal sewing supplies
This is a fat quarter grouping I purchased in the sale room at my LQS.

I love that little Christmas tree print on the left, but there was only about 6" of it. I decided it could become pinwheel blocks for the center. I made 6-1/2" unfinished blocks, starting with 3-1/2" strips, cutting the HST's with my Easy Angle ruler, my favorite method.
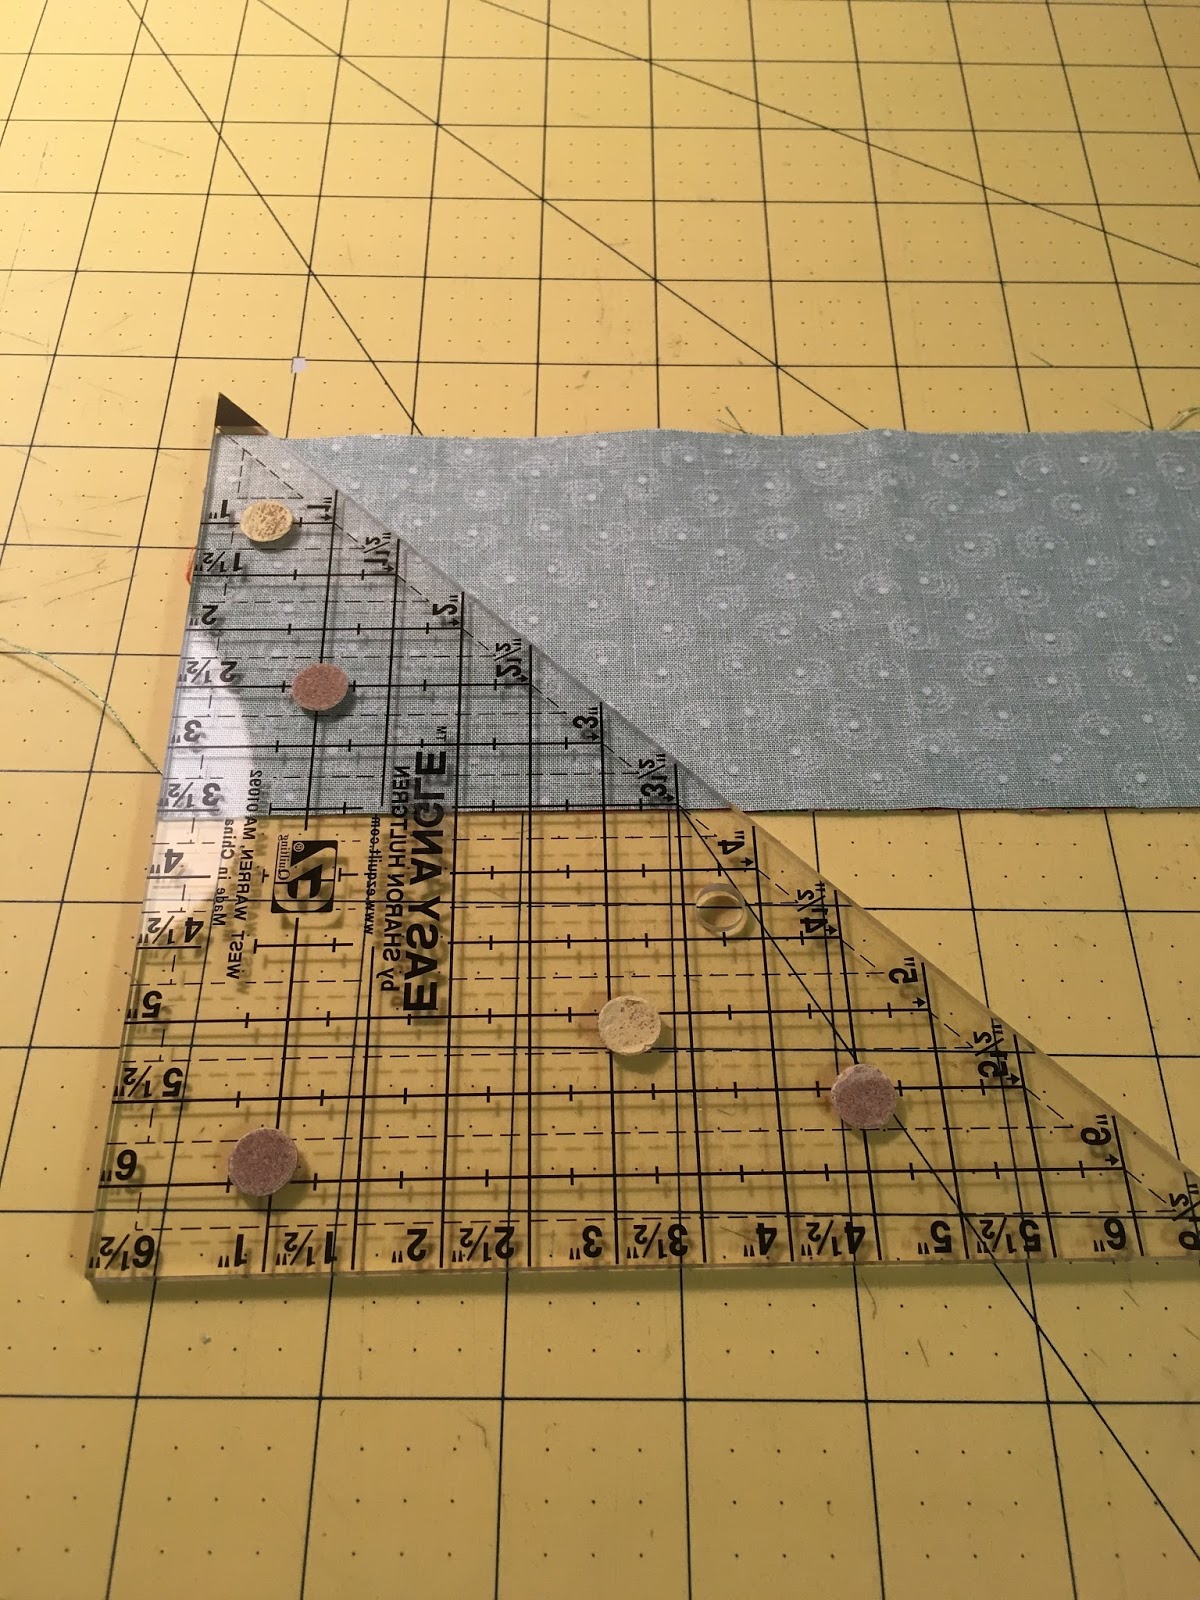
If you make your HST's from squares, you will need 4" squares, then trim your HST's to 3-1/2". Press well. (Don't you just love the little triangles it makes on the back when you spin your seams?)

I made three pinwheels and put them together with 2-1/2" strips of another fabric. You can do this center anyway you please according to the piece of batting you have and any blocks you have on hand or decide to make.

Choose your backing and cut 1" larger than your batting on all 4 sides. Mark the centers on your backing, batting and center design and layer with centers matched. Spray or pin baste layers together. (I do both).

Secure the three layers together by adding your first strips to the ends of your center design. Place another 2-1/2" strip on each end, RST, sewing through all layers, using a 1/4"seam and your walking foot. Trim your strip even with your center blocks.

Press seam toward the outer edge. Repeat on the other end of your center blocks.
Now using 2" strips of a coordinating fabric, add strips in the same manner to the long edges.

I was using fat quarters so needed to seam some of my strips to make them long enough. I used the diagonal seaming technique to make the seams less obvious.

Be sure to press each strip toward the outer edge before adding another strip.
I added another row of 2" strips on the long edges before adding the border on all four sides.

I made the border from 2" strips also, sewing on the short end strips first. Press this last row toward the outer edge.
Now is the time to add some quilting to your center blocks if you would like
.

I used a curved line through the center on the green HST's.

You can add as much or as little quilting as you wish. Remember, you were quilting the layers as you were adding your strips!
I used 2" binding strips in a different coordinating print, pressing them WST to make a 1" binding, sewing to the right side by machine, turning over the edge and hand stitching to the back. This makes a very snug binding. If you prefer, use 2-1/2" strips for a wider binding.
Now for an optional design.

The center fabric was something I fell in love with last year. It is a Holly Taylor fabric, called Town Square. (Good luck finding it if you love it too.) I used it for a center panel, fussy cutting the design to fit my size. Using the same quilt as you go technique, I added 2" strips in coordinating fabrics, only this time I added them in a courthouse steps style to all four sides.

I used a large meander to quilt the center.

The possibilities are endless with this technique. If you try it and like it, send a photo to me and I will include it in a future blog post. Or if you use Bloglovin, just add it to a comment on this post.
I hope you enjoyed this project and will visit again soon. Remember to leave a comment to be included in the drawing for those great Tula Pink fabrics.
And keep on stitchin'
Judy
Thank you for sharing your project. I really like the table runner with the focus fabric as the center.
ReplyDeleteThanks for the tutorial. I love that this can be easily re-sized to fit whatever space you need it for.
ReplyDeleteCute table runners. I like to make them as teacher gifts.
ReplyDeleteI've never done a quilt as you go project. The table runners seems like a good first project. Thanks for the tutorial.
ReplyDeleteThanks for the tutorial. That seems quite manageable. Janice.snell@gmail.com
ReplyDeleteBeautiful table runners - quilt as you go is great for this project
ReplyDeleteGreat idea! Thanks for sharing.
ReplyDeleteThanx for the info...I shall try one
ReplyDeleteI love tablerunners!!! They're instant success! Thank you for your tutorial.
ReplyDeletelove these ideas for table runners, thanks for sharing
ReplyDeleteI love your table runners. I am always on the look out for new ideas.
ReplyDeleteGreat idea!
ReplyDeleteThank you! The possibilities ARE endless. I appreciate your well illustrated tutorial. dezertsuz at gmail
ReplyDeleteVery use tablerunners. I think that I will start making mine reversible to us up those orphan blocks. I love your terminology- frankenbatt. Yup, I have plenty!
ReplyDeleteThanks for sharing. Always need table runners.
ReplyDeleteI especially like your Town Square table runner--so pretty!
ReplyDeletebarbkaup@(yahoo)(dot)(com)
It's fun to make a Quilt-As-You-Go table runner! Saves time and looks great!
ReplyDeleteJust what I need, another idea to play with! Not really, but that's not going to atop me!
ReplyDeleteGREAT IDEA TO LEARN A NEW TECHNIQUE THANKS AGAIN
ReplyDeletehjrogers@sympatico.ca
I love table runners. I'm going to have to try the QAYG method.
ReplyDeleteGreat table runner and I love those little Christmas prints you used for the pinwheels.
ReplyDeleteIt's a lovely Christmas project, thank you for the tutorial.
ReplyDeleteLove the runner and love pinwheels. Thanks for the tutorial.
ReplyDeletepatsystitch@gvtc.com
Love the fabric. The runner is beautiful. Thanks for sharing.
ReplyDeleteWow, wow, wow! This is such a great idea. Thank you SO much for the excellent tutorial.
ReplyDeleteDebbie
ollieami@aol.com
I especially love the runner you made with the Town Square panel. I've never seen a nicer panel. Great instructions too.
ReplyDeleteThanks for the tutorial. I love QAYG!
ReplyDeleteI like the last one best!
ReplyDeleteI have an Easy Angle ruler that I've never used - now I know what to use it for.Thank you
ReplyDeleteclever idea with the snow scene. thanks for sharing.
ReplyDeleteGreat table runners! I've always loved anything with pinwheels.
ReplyDeletePretty tablerunner-never tried quilt as you go before-will have to try this one! Thank you for sharing, Susan
ReplyDeleteYour spun seams on the back of the pinwheel look so pretty! I just haven't grasped how to do that, no matter how much I try. kthurn@bektel.com
ReplyDeleteCute table runner. Thanks for sharing your ideas. cknapp3626(at)sbcglobal(dot)net
ReplyDeleteBoth of these table runners turned out so cute!! I would like to try the quilt as you go method, and this looks like a great way to try it. Thanks so much for sharing!! IronLftr10@yahoo.com
ReplyDeleteGreat tutorial, thanks
ReplyDeletekarb328@aol.com
These are wonderful table runners. Thank you for sharing!
ReplyDeleteI really like these! I had never thought to spin the seams on a pinwheel, so I learned something new today--thanks!
ReplyDeleteThanks for sharing!
ReplyDeleteThat panel fabric really is pretty.
ReplyDeletetvonzalez at gmail dot com
Great table runners. Especially like the Town Square runner. ndfromsdATgmailDOTcom
ReplyDeleteYou're right. That town square table runner is very nice. I wouldn't have known what to do with the fabric if I'd seen it last year. Now, I'll be better prepared for the next time. Thank you for the great idea of quilting as you go.
ReplyDeleteThis is a perfect size project to try the QAYG method. I have not tried it yet but habe been nervous to try it on a bigger quilt. Thank you for the tutorial.
ReplyDeleteThis comment has been removed by the author.
ReplyDeleteGreat tutorial! I love that center panel on the second runner too. What a sweet picture! Happy Christmas in July!
ReplyDeleteThanks for sharing your topper with us. Love pinwheels!
ReplyDeleteLove your table runners. This will make a great project for a quick last minute gift!
ReplyDeleteLove both versions!! Thanks for sharing!!!
ReplyDeleteSimple table runner patterns. Pick some Christmas or winter fabric and sew. Thank you for sharing.
ReplyDeleteGreat projects to get us sewing and keep inspired. Thanks sew for chance to win
ReplyDeleteBeautiful table runners!
ReplyDeletethese are lovely runners. I love the scene fabric. thanks for sharing.
ReplyDeletequilting dash lady at comcast dot net
O Gosh! Town Square is My Favorite! I bought a whole bundle I loved it So!
ReplyDeletebeautiful
ReplyDeleteGreat ideas! Thanks for sharing
ReplyDeleteThank you for the tutorial, and especially the pictures. Sometimes I have a hard time "seeing" in my mind what the author intends. momoftana at yahoo dot com
ReplyDeleteVery nice! Turned out great. Thanks for sharing!
ReplyDeleteI love the pinwheel table runner. Thanks for sharing!
ReplyDeleteReally pretty items! The last one is beautiful!
ReplyDeleteThere are lots of possibilities for this quilt pattern. I appreciate the wonderful photos of in progress.
ReplyDeleteLove your picture of your Christmas stash. I must have or have had at least half of those fabrics. LOL Love the runners, especially the couple done with the panels. Great job and great ideas.
ReplyDeleteGreat idea and quick. I really like the idea of using a panel scene too.
ReplyDeleteThat Christmas panel is beautiful. Thank you for being part of the blog hop. delissac@hotmail.com
ReplyDeleteVERY NICE TABLE RUNNERS YOUR HOME WILL BE SO FESTIVE THIS WINTER READINGTIRZAH AT YAHOO.COM
ReplyDeleteThanks for the tutorial. It seems like it will go together very quickly and would make nice gifts.
ReplyDeleteVery nice table runners. Thanks for participating in the blog and for the good ideas!
ReplyDeleteThanks for the tutorial--it's not Christmas without pinwheels!
ReplyDeleteeahorgan@gmail.com
Wonderful tutorial for a table runner and your Christmas ones are beautiful. The scenic one is gorgeous! Thanks for sharing.
ReplyDeleteGreat tutorial! Love the pinwheels!
ReplyDeletenikilsend(at)outlook(dot)com
I've always loved pinwheels! I also love anything Holly Taylor...I have so much of her fabric I won't let myself buy anymore until I've
ReplyDeletecreated a thing or two,... or three.....
Cute runner, I love pinwheels! Thank you!
ReplyDeleteYour runner is very festive.
ReplyDeleteYour runner will dress up your table nicely.
ReplyDeleteYour runner is very cute.
ReplyDeleteAh what a nice size project to learn QAYG on.
ReplyDeleteI love the Holly Taylor and I believe I have this in my stash!! I got to try doing that fussy cut of it. I love your runner.
ReplyDeleteThanks for the table runner ideas!
ReplyDeleteLove this project and you gave great instructions. I even have some scraps of a different Holly Taylor fall fabric that would make a great table runner. Love the idea!
ReplyDeleteEasy Peasy and lovely way to use up orphan blocks or panel blocks.
ReplyDeletenl@ridder.ca
I love seasonal table runners, they make such nice gifts. If you can use up leftover fabric and batting to make them, then I'd call it a win-win!
ReplyDeleteSo pretty. I love quilt-as-you go things. Thanks.
ReplyDeleteThis is a great idea! I can hardly wait to try it.
ReplyDeleteGreat idea--love your table runners! Thanks for sharing!
ReplyDeleteQAYG makes it a speedy gift. Thanks for participating in the 12 Days of Christmas in July Blog Hop!!
ReplyDeleteOh, I do love the Town Square panel!
ReplyDeleteThis is so adorable, and you did a great job with your tutorial! Thanks for all your good work that helps make the hop a success!!!
ReplyDeleteWhat a lovely table runner - I made a similar one 2 years ago as a gift and it was much appreciated :)
ReplyDeleteWonderful idea! I have a couple of orphan blocks I can use to get started.
ReplyDeleteI have always loved quilt as you go projects. I will be adding your idea to my list.
ReplyDeleteVery pretty table runner. I was glad to see how you made it as I have the easy angle ruler and have only used it once. Will look forward to using it again. thanks.
ReplyDeleteWow very cool ideas tytytyty need to save this one too... happyness04431@yahoo.com
ReplyDeleteThanks for sharing this idea! I really love the little Christmas tree fabric you used in the pinwheels. Too cute!
ReplyDeleteThanks for sharing these. I love little pinwheels!
ReplyDeleteI haven't tried quilt-as-you-go yet, but this looks like a good starting project. Thank you.
ReplyDeleteI haven't tried quilt-as-you-go yet, but this looks like a good starting project. Thank you.
ReplyDeleteLove the ideas and ease of these table runners. Thank you. ykcihc5@yahoo.com
ReplyDeleteThanks for a great tutorial on making your table runners. mfhagopian@aol.com
ReplyDeletePinwheel blocks have always been a favorite of mine, so your table runner is a project I need to add to my list! I also like how you used a section of a panel to make a runner. I have a few panels that I think would work for this! Thanks so much!
ReplyDeleteHi Judy! Love the Pinwheel table runner. It is just adorable.
ReplyDeleteI love pinwheel blocks. Your runner looks awesome!
ReplyDeleteGood tute on QAYG, thanks. I love Town Square. Fortunately I got some last year.
ReplyDeleteCute. creations4u7@aol.com
ReplyDeleteThis is adorable and has many options. Thanks.
ReplyDeleteWonderful design and so versatile. Love the pinwheels.
ReplyDeleteI'm a big fan of QAYG. Thanks for another idea of how to use one of my favorite techniques.
ReplyDeleteI never know what to do with panels. Nice job.
ReplyDeletePanels can be a challenge, but you've chosen well--nice job! susanprincess at att dot net
ReplyDeleteGreat table runner! beimborn@charter.net
ReplyDeleteThank you for a great tutorial. x
ReplyDeleteWonderful idea and tutorial, Judy!
ReplyDelete*Thank you!*
Great way to use those beautiful scraps!
Pat T.
Hi Judy,
ReplyDeleteI love the pinwheels! I also love table runners so this is a winning combination for me. ~smile~ Roseanne
Thanks so much for the tutorial and showing us how you actually quilted the project! Love the pinwheels!
ReplyDeleteLove the pinwheels! Thanks for sharing!
ReplyDeleteGreat, quick, stunning idea for Christmas or any season. Like the QAYG method too. I can see me doing this as a fast and furious project. Thanks for sharing your project. D. Weeks (aka Momma Llama)
ReplyDeleteThank you. ... very pretty, both projects!!
ReplyDeletekcummings71@gmail.com
Thanks for the tutorial. It does look fast and easy.
ReplyDeleteBeautifully finished projects that are quick to make then decorate for any holiday theme, thanks for sharing and Merry Christmas in July.
ReplyDeleteLook at that beautifully spun seam on that pinwheel block! Thanks for sharing your project with us. lutzcats (at) yahoo (dot) com
ReplyDeleteI love table runners, and yours looks great! Great idea about using the panel.
ReplyDeleteRunners are great for those small gifts you need and this one is very nice. THank you!
ReplyDeleteOh I love Holly Taylor, have a Buggy Barn quilt using all her Christmas fabrics for my bed in December! Yup love the spinning seams and the little pinwheel they create. Cute runners, both!
ReplyDeleteCute table runner! Only 6 months left to make a few for gifting! THANKS!
ReplyDeleteI love the idea of quilt at you go. I am a hand quilter and I think I could do this one 1
ReplyDeleteI love anything pinwheels - they always look happy and festive. Thanks!
ReplyDeletePlease click on the delaineelliott above for my email link.
I haven't tried the quilt as you go method yet but it sure seems like something I ought to try! I enjoyed your tutorial and yes, I do like spinning seams on pin wheels! :)
ReplyDeleteHI,LOVE YOUR COLOR CHOICES! THANKS FOR SHARING! msstitcher1214@gmail.com
ReplyDeletegreat idea, and I even have some Town Square fabric on hand. How abut that!
ReplyDeleteWonderful for the holidays! Thank you for the tutorial :)
ReplyDeleteI absolutely love your second runner with the Town Square fabric. It is so neat. Thanks for participating.
ReplyDeletePat
I love the town square runner. Looks so elegant.
ReplyDeleteWhat a great idea. I just found some orphan Christmas blocks the other day. Now I know what to do with them. Thank you.
ReplyDeleteCute table runner! I love how you made it scrappy. While your Christmas fabric stash is impressive, I'll bet mine could give you a run for your money! Thanks for sharing the tutorial.
ReplyDeleteGreat idea Judy! I like how the QAYG gives you (basically) a stitch-in-the-ditch effect without having to stitch-in-the-ditch, which then sets you up to do additional quilting without worrying about shift. So inspiring!
ReplyDeleteYou take some awesome photos, I appreciate how clear and bright they are. What do you take your pictures with? Do you have special lighting?
~Brandy
Very pretty runners.
ReplyDeleteGreat runners! I am always looking for quick projects for gifts.
ReplyDeleteLove these--an awesome gift idea!
ReplyDeleteOooh- pinwheels are a favorite of mine! I really need to give QAYG a try, thanks for the tutorial!
ReplyDeleteWhat a wonderful idea to do a table runner as a QAYG. I love it, and so simple! Thank you for sharing a great project!
ReplyDeleteThose are both beautiful! I've done a couple QAYG projects and I love being almost finished once the piecing is done!
ReplyDeletehello!,I like your writing very a lot! percentage we communicate extra approximately your post on AOL? I require an expert on this area to resolve my problem. May be that's you! Taking a look forward to look you.
ReplyDeleteHello friends, how is all, and what you want to say on the topic of this article, in my view its genuinely awesome in support of me.
ReplyDelete